Overview
If you know how to position your cut accurately on your material, you'll experience more successful results, less waste, and the possibility to test and cut small pieces using scrap. This article describes how to position the Epilog X-Y origin right where you want it.
You will need to master two main topics:
1. In your drawing software: how does the position of your figure on the drawing page relate to the X-Y instructions sent to the printer (here, the Epilog)?
2. On the Epliog, how do you set and reset the X-Y origin?
Neither of these is a difficult topic, but both are subject to a few minor gotchas and misdirections.
Note: The following discussion assumes you are working with a top-left origin, as this is easiest for positioning multiple cuts relative to raw material sheets. As an alternative, the Epilog print setup General tab has a "Center Engraving" option which sends cutting/engraving instructions positioned relative to an Epilog origin assumed to be in the center of your cutting area (on X, Y or both axes). That can be useful for engraving decorations onto an existing object. However, the discussion here assumes that the Center Engraving checkbox is unchecked!
Drawing software issues
Let's assume you already know the basics of using a vector-based drawing program (such as Inkscape) to create a cutable file. Now you need to understand how the position of your figure on the drawing page relates to the position of the instructions sent to the printer (here the Epilog).
For Inkscape, this is easy. The top left of the page corresponds to the 0,0 origin on the Epilog.
- Your drawing program, like Inkscape, may have an origin at the bottom left of the page, with X positive left to right, and Y positive bottom to top (like traditional Cartesian coordinates). Regardless, when your drawing is printed to the Epilog, the driver translates position on the page as though X is left to right (unsurprising) and Y is positive from top to bottom. Possible snags:
- If you change the drawing page size, you must arrange that your figures are positioned relative to the top of the new page at the distance you intended!
Border: what to do?
For normal documents that you print on paper, you usually position your figure at some distance from page edge, to leave a blank border around it. Indeed, most paper printers can't print within 0.25 in (or more) of the page edge anyway.
Yet for laser cutting purposes, positioning figures very close to the top left of the page requires less thought to position them optimally on the Epilog in subsequent steps.
- Do not, however, position them beyond the left or top page edge:
- Your software might clip the drawing at that edge, so that part won't cut
- The Epilog won't print in the negative X and Y range.
Epilog origin setting
When the Epilog is newly powered up, or you use the Reset Origin feature (see below), the Epilog adopts an origin at the extreme top left of the bed, as shown in this photo.
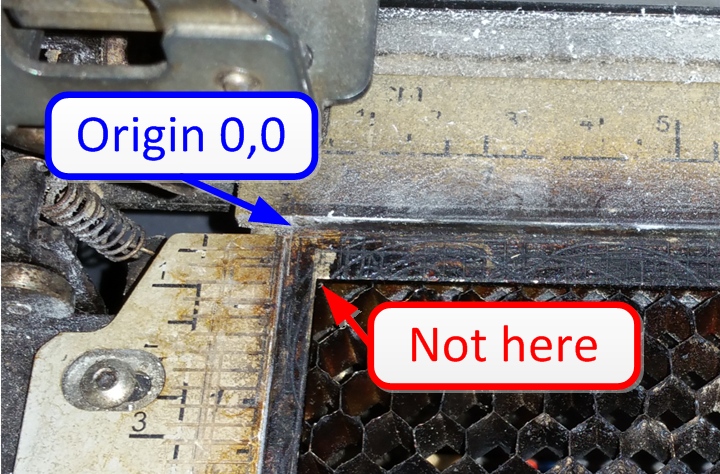
Note that there's a step at the frame that surrounds the bed honeycomb grid, and it's too easy to accidentally position material there by mistake. Instead, as the (somewhat worn) ruler markings suggest, (0, 0) is right at the ruler edges.
(Of course, you aren't required to position your material abutting the rulers. You just need to coordinate the material position with the position of the Epilog origin and the position of your drawing relative to the origin. So if your figure is one inch from the top and left edges of the drawing page, you could position your material a bit less than an inch from the rulers, and the cut will be performed close to the edge of the material. But in general, you can work more consistently by butting the material against the rulers.)
Your second and subsequent cuts
Once you've cut a piece at the top left of your material, you'll want to cut another one somewhere else on your material.
- You could flip the material over (end-for-end, or top-for-bottom), but that only gets you four cuts. So you still need to know how to shift your cut to any arbitrary location.
- You could go back to your drawing program, move your figure to a new position on the page, and print it again to the Epilog. This is tedious:
- You have to do all the drawing --> Epilog print steps, and even more steps if you have to transfer your file from another computer.
Instead, just change the origin on the Epilog...
Setting the Epilog origin ("home" position)
On the Epilog, you will disengage the X and Y motors, allowing you to move the laser head to the desired location, and then you tell the Epilog that this is the new origin.
Steps:
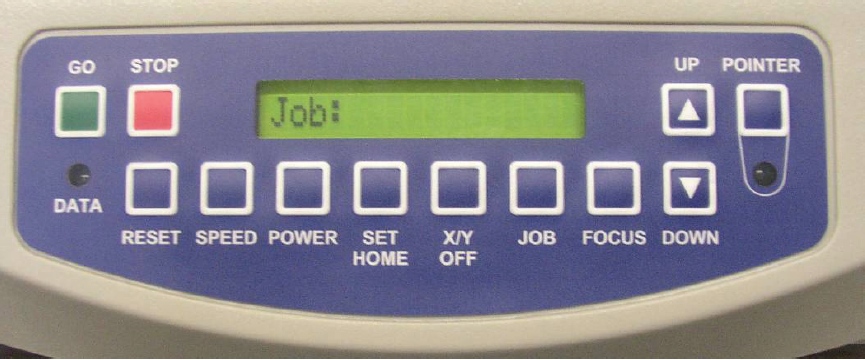
- Press "X/Y Off" The display will ask whether you want to disable the motors.
- Press "GO" to say yes. (Which seems counterintuitive, I know.)
- Press POINTER to turn on the red-dot position marker, so you can see where the laser will cut.
- Open the cover, and, by hand, move the X-axis rail ("gantry") forward and back, and the carriage left and right, to position it where you want. Tips:
- Do not force the carriage! It should move easily by hand. If it does not, you may not have disengaged the motors.
- Do not leave the carriage at a negative X or Y positions (as shown on the display), as the Epilog will not accept those as the origin, and instead will retain the current origin (almost certainly causing you chagrin, grief, or worse, when you subsequently cut).
- Assess the position by observing the red dot.
- Depending on the color of your material, you may not be able to see the red dot very well. Place a piece of white paper over your material, on which you can see the red dot.
- You can slide the top and left edge of the paper up to the edge of holes previously cut in your material, and then position the red dot slightly inboard from the top and left edges, so that your new cut will be on fresh material.
- Press SET HOME to tell the Epliog that this is the new origin location.
- Display reads something like "Set home position". This seems like it's asking for confirmation, but it's not. Don't hit the GO button, as that'll start the cutting operation (unless that's what you want to do).
- Proceed with your new cut
- You can press GO with the lid open, which will proceed with the cut motions but with the laser off.
- Close the lid and press GO to perform the actual cut.
Where is the current origin?
You may have forgotten the current origin position. When this happens:
- you may just want to set a new origin.
- You could hit the RESET button, which sends the carriage to the current rest position, which is a bit in front of the actual origin position.See "Possible confusions" below.
- You can always run your job with the lid open (with the red dot POINTER on) to see where it will cut.
Resetting the Epilog origin
Press RESET and SET HOME simultaneously to reset the origin to the top left of the bed.
Possible confusions
The "rest" position is misleading
After a job, or after RESET or power-on, the Epilog positions the carriage to a rest position that, for some reason, is a half inch in front of the actual current origin position. This is misleading in multiple ways:
- It suggests that the origin is a half inch further forward than it really is.
- It perhaps suggests that, when setting a new origin, you should position the carriage a half inch in front of the actual position you want. Wrong!
- Unexpectedly, if the carriage is at the current home position, and you perform the new origin setting procedure (X/Y OFF, SET HOME) without moving the carriage, then you will have moved the origin a half inch forward!
Margins on your drawing will make you think extra hard
When you're trying to position a cut that only just fits into an unused area of material, it's easiest if your figure is not offset from the origin. If instead your figure was drawn substantially away from the edge of the page (leaving a margin at top or left), then you'll have to allow for that by positioning the Epilog origin correspondingly further left and upward.
 Uploading ....